




STALKER 2'deki Tüm Anormallikler: Türleri, Baş Anormallikler ve Nerede Bulunurlar










 GSC Game World
Twelve anomaly types sit scattered across the Zone, and seven larger Arch Anomalies sit on fixed spots holding loot you cannot get anywhere else. The two categories work differently enough that treating them as one list gets people killed: a common anomaly can be disarmed with a bolt and walked through during its cooldown, while an Arch Anomaly is a permanent hazard with a puzzle or a survival requirement attached. This guide covers all anomalies in STALKER 2, the signs that give each one away, and what waits inside the seven big ones.
Every Anomaly Type in STALKER 2
Twelve types, and the last column is the one that matters most in a hurry. Two of them ignore bolts entirely. Anomaly damage lands on your suit before it lands on you, so the resistances you are wearing decide how much of a mistake you can afford, and Best Armor and Artifacts in STALKER 2: Suits, Slots and Cost of Hope Additions covers which suits hold up in which field.
Anomaly | What gives it away | Damage type | Bolt-triggerable |
|---|---|---|---|
Burner | Small flames on the ground | Thermal | Yes |
Electro | Sparks jumping off ground and objects | Electrical | Yes |
Tesla | A ball of lightning patrolling a fixed path | Electrical | No, it moves |
Vortex | A near-invisible bubble in the air | Physical | Yes |
Springboard | Leaves turning in a circle | Physical, stun first | Yes |
Fruit Punch | Toxic puddles giving off fumes | Chemical | Yes |
Gas Bubble | Large bubbles drifting toward you | Chemical | Yes |
Gas Cloud | Stationary green gas | Chemical | Yes, three bolts |
Flashbang | A flash and an explosion, no warning | Physical | No |
Glass Shards | Sparkles in the air at a distance | Physical, bleed | Yes |
Flycatcher | Sound and visual distortion only | None, slows you | Yes |
Teleporter | A floating orb, large or small blue | None, moves you | No |
How Anomalies and Bolts Work

Bolts do two separate jobs, and most players only use them for one. Thrown ahead, a bolt reveals an invisible anomaly before you step into it. Thrown into a known anomaly, it sets the thing off, and the cooldown that follows is your window to walk through. That second use is what turns an Electro field from a wall into a corridor.
Not everything plays along. A Flashbang cannot be disarmed at all, which is why it kills people who have grown comfortable with the bolt routine. A Gas Cloud needs three bolts rather than one. A Tesla travels a set path instead of sitting still, so timing beats triggering. Glass Shards are the strange exception: walking through them prevents the damage entirely, though your armour durability still takes the hit.
Detectors handle the other half of the job by pinging when an artifact sits nearby, on a tone distinct from the anomaly warning. Upgrading matters more than most people expect, since the Bear Detector adds a compass-style display that points you at the artifact instead of just telling you one exists. Carry thirty bolts before entering unfamiliar ground. I have run out twice, and both times I ended up probing a field by walking into it, which is exactly as expensive as it sounds. Mutants do not respect anomaly boundaries either, and All Mutants in STALKER 2: Full List, Weaknesses and How to Kill Them covers the ones that will chase you straight through a field you were carefully working around.
All Common Anomalies Explained
Twelve entries, grouped loosely by what they do to you rather than by the game's internal categories. Several of these can be cleared with a shot instead of a bolt, and STALKER 2 Weapon Tier List: Every Gun Ranked, Including Update 2.0 and DLC covers which guns have the accuracy to do that from a safe distance.
Burner

A Burner shows as small flames licking the ground, and it looks harmless until you cross the trigger radius. Then it erupts into a firespout that ignites anything standing over it. Underground stretches and narrow rooms are where it does the most damage, because there is nowhere to step aside. Set it off with a bolt and move through during the reset, and wear something with a thermal rating above 1.0 in case the timing goes wrong.
Electro

Sparks coming off the ground and nearby metal mark an Electro field. Trigger it and it detonates into a surge of electricity that damages you and disables electronics. Watch the discharge rhythm rather than sprinting, because the gaps are long enough to walk through once you have counted them.
Tesla

A Tesla is an Electro variant shaped like a ball of lightning that patrols a fixed route, and it has one behaviour nothing else in the Zone shares: it hunts artifacts. Carry one equipped and it will follow you. Leave one on the ground and it will travel over to consume it. That second habit is useful, since dropping a cheap artifact pulls the Tesla away from the path you want.
Vortex
Almost invisible, a Vortex reads as a faint bubble in the air where the light bends wrong. It compresses the space inside it and releases it, which does heavy physical damage to anything caught in the middle. Bolts reveal and trigger it. Swirling dust and floating debris usually mark the area before you see the bubble itself, and a low hum sometimes carries further than the visual does. Physical damage artifacts blunt the hit if you are caught mid-crossing.
Springboard

Leaves and litter turning in a slow circle give a Springboard away. Step in and it becomes a small tornado that stuns you first and damages you after, and the stun is what makes it dangerous, because it holds you in place for the damage. Grass and rubble hide these well, so probe ahead in overgrown terrain. Two of them often sit close together, which catches anyone who triggers the first and walks straight into the second.
Fruit Punch

Toxic puddles releasing fumes that eat your health while you stand near them. Contact causes chemical burns and radiation on top. Triggering it with a bolt makes it release bubbles and opens a safe window to cross. Flooded lowlands and swamp edges are where they hide, and their reflections blend into the water. Anti-radiation medicine handles the residue afterwards, since the burn is only half of what it does to you.
Gas Bubble
Large toxic bubbles that drift slowly toward you rather than waiting. Burst one and it splits into smaller stationary bubbles that still deal acid damage if you walk into them, so shooting from a distance solves the movement problem and creates a minefield in its place. Clear them with enough ammo to finish the job.
Gas Cloud

Concentrated green gas sitting still in the air. It deals acid damage when triggered and then dissipates, which makes it one of the easier fields to clear permanently. The catch is the cost: three bolts, not one. Budget for that before you start throwing.
Flashbang

The one anomaly that refuses every trick you have learned. A Flashbang detonates as a bright flash and an explosion with no reliable tell, and a bolt will not disarm it. Distance is the only answer, so give suspect ground a wide margin rather than probing it.
Glass Shards
Floating shards of glass held in a gravitational field, visible from a distance by the sparkle they throw off. Passing through cuts you and applies bleed. Walking rather than running prevents the damage completely, though your armour still loses durability, so keep bandages handy if you have to cross one at speed.
Flycatcher
Nearly invisible, detectable only through sound and a warp in the air. Anything passing through slows down and your vision distorts while you are inside it. It does no damage, which makes it more of a trap than a threat, since it will hold you in place while something else closes the distance.
Teleporter
A Teleporter appears either as a large floating orb or as one of the smaller blue orbs dotted around the Zone. Entering one moves you somewhere else, and the destination sometimes turns out to be a stash you had no other route to. There is no protection and no way to disarm it. Whether that counts as a hazard or a shortcut depends entirely on your appetite for surprise.
Arch Anomalies and Their Legendary Loot
Seven Arch Anomalies, also called Anomalous Areas, occupy fixed locations and run far larger than a common field. Each one holds a legendary artifact, and six of the seven hold a Weird item that exists nowhere else in the Zone. Reaching several of them means crossing territory somebody has claimed, and All Factions in STALKER 2: Bases, Reputation and Who to Side With covers who will be shooting while you work.
Arch Anomaly | Region | Loot |
|---|---|---|
Poppy Field | Lesser Zone | Weird Flower |
Bulba | Lesser Zone | Weird Ball |
Wandering Lights | Zaton | Weird Water |
Mist | Burnt Forest | Weird Pot |
Tornado | Yaniv | Weird Bolt |
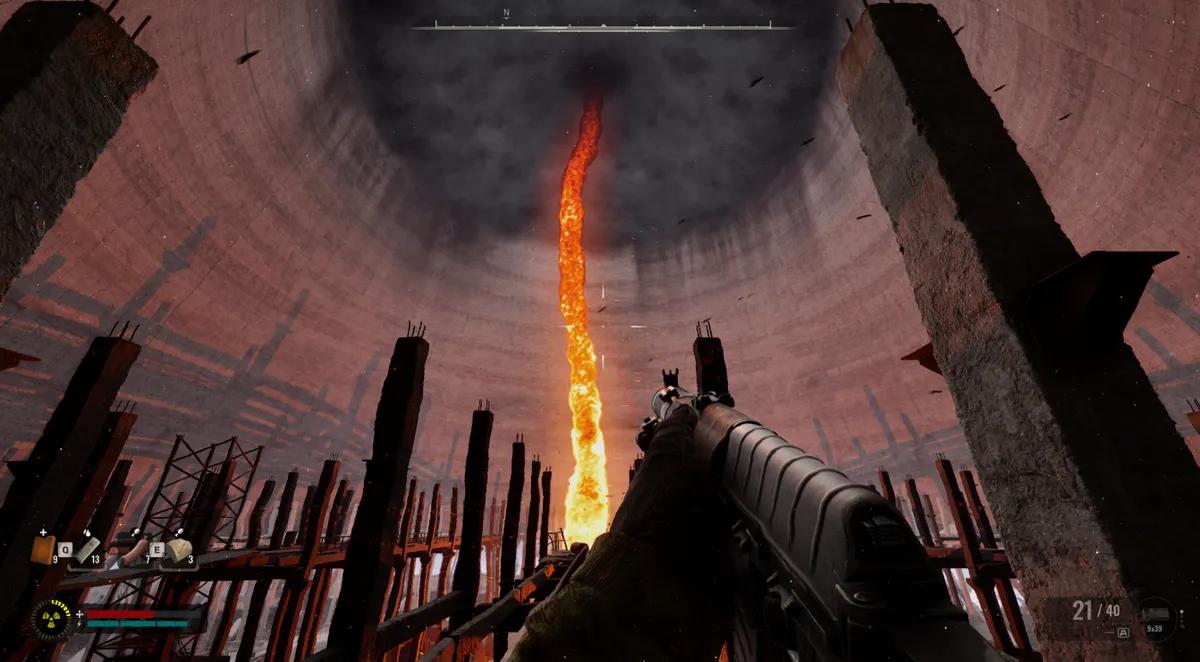
Fire Whirl | Cooling Towers | Weird Nut |
Cage | Cement Factory | SEVA-D Suit |
Poppy Field

A field of flowers in the Lesser Zone that puts anyone crossing it to sleep. The drowsiness builds the longer you stay, and passing out inside is fatal. Energy drinks hold it off long enough to reach the Weird Flower and get back out. Without them, do not enter. The field looks like the calmest ground in the Lesser Zone, which is exactly why people walk into it.
Bulba

A large floating ball in the Lesser Zone that vacuums everything toward itself and kills whatever reaches the centre. Work the edges of its pull rather than the middle, and use bolts to find the line where the gravity stops dragging you. The Weird Ball is the payoff.
Wandering Lights

This one in Zaton only exists between 22:00 and 04:00, so a daytime visit finds nothing. Inside the field, your vision blacks out past a few metres and psi hallucinations start dealing real damage. Bring psi protection and a light source, and know your exit before you walk in. Loot is the Weird Water. This is the one Arch Anomaly where turning up unprepared has no recovery, because you cannot see far enough to find the way back out.
Mist

A cabin sits inside the fog in the Burnt Forest, and the Weird Pot sits inside the cabin. Try to leave without it and the anomaly puts you back where you started. The way out is the puzzle rather than the walk, which makes this the only Arch Anomaly you cannot simply survive your way through.
Tornado
A moving tornado in a cargo area near Yaniv, with the Weird Bolt circling inside the funnel. Entering the funnel damages you, so this is a grab that costs health rather than one you can do cleanly. Stock healing items before you commit.
Fire Whirl

A stationary column of fire inside one of the Cooling Towers, holding the Weird Nut. Thermal protection is not optional here. Anything with a low thermal rating turns the approach into a race you lose.
Cage
An invisible field covering the whole Cement Factory that deals tick damage the entire time you are inside it. The reward is the SEVA-D Suit rather than a Weird artifact, and it sits at the top, which means climbing while your health drains. Bring more healing than you think the climb needs.
Anomaly Fields Added in Cost of Hope

The expansion's two regions run on localised fields rather than the scattered single anomalies of the base map, and old habits from Zalissya do not transfer. Every Cost of Hope DLC Mission in STALKER 2 covers which quests take you into each one.
- Rusted Maze, Iron Forest. Electro anomalies strung across collapsed steel beams with almost no warning, frying stamina and electronics on contact.
- Sunken Swamp, Iron Forest. Quieter and worse, because the moss covers the surface ripple that normally reveals a Vortex sitting under the water.
- Administrative Block Courtyard, near the power plant. Causes spatial displacement rather than damage, which is more disorienting than it sounds the first time it fires.
- Flare Anomaly, Water Treatment Facility. A single enormous field in the middle of a water channel that puts out psi radiation waves. Crossing it requires five Flickering Flare artifacts equipped at once, which means a suit with five open slots.
Where Anomalies Cluster Across the Zone
Anomalies concentrate where radiation is heaviest and where the original disaster left the most damage.
- Chornobyl Nuclear Power Plant. Every type in one place, the densest and the most rewarding ground in the game, opened by Cost of Hope.
- Red Forest. Gravitational and chemical fields under high radiation, with terrain that limits your escape routes.
- Swamps. Chemical anomalies, hidden paths, and the mutants that use both.
- Prypiat. Burners and Electro fields inside narrow buildings, where triggering one leaves you nowhere to stand.
Regions do not fence anomalies in. A Springboard on an empty roadside will kill you the same way one in Prypiat does, and open ground makes you complacent faster than a corridor does.
Gear That Keeps You Alive Around Anomalies
Match protection to the field rather than buying the highest overall number. Thermal covers Burners and the Fire Whirl. Electrical covers Electro, Tesla, and most of Iron Forest. Chemical covers Fruit Punch and both gas types. Psi is the one people skip, and it is the one Wandering Lights and the Flare Anomaly punish hardest.
Consumables carry more weight than the suit in several of these. Energy drinks make Poppy Field survivable. Anti-radiation medicine covers the residue from Fruit Punch. Bandages handle Glass Shards. Bolts cover everything else, and I would rather leave a rifle behind than walk into the Red Forest without a full stock of them.
Artifacts complicate the calculation, since most of them raise your radiation while they help you. Absorption effects are worth more than combat bonuses until you have mapped where the fields sit, and that preference should hold right through the endgame, where All STALKER 2 Endings: Four Base Routes and Both Cost of Hope Outcomes shows how much anomalous ground each final route puts between you and the credits.


 Başarıyla kopyalandı... İçeriğimizi paylaştığınız için teşekkür ederiz!:



100 mücevhere kadar %5 para yatırma bonusu

Para yatırma ve çekme işlemlerinde %0 ücret.





11 Para Yatırma Bonusu + FreeSpin


EKSTRA %10 PARA YATIRMA BONUSU + ÜCRETSIZ 2 ÇARK DÖNDÜRME

Ücretsiz Kasa ve %100 Hoş Geldin Bonusu


5 Ücretsiz Kılıf, Günlük Ücretsiz ve Bonus

3 ücretsiz kasa ve tüm nakit para yatırma işlemlerine %5 bonus eklenir.

Depozitoya +%5




Yorum