




Rezonanslı Panoptikon Servis Talebi İşlem Kılavuzu: Hücreler ve Değiştirilmiş Radyo










 PlayStation
 Xbox
Xbox Steam
SteamPanopticon Service Request is one of the first side stories most players run into, and it is short, safe and entirely puzzle-driven. There is no combat, no traversal challenge and nothing that can kill you. What it does have is a cell-numbering trick that stops people cold, and a final step that depends on what the radio happens to be saying when you pick it up.
Panopticon Service Request Quest Overview
Type | Side Story |
Zone | Central |
Requirement | Access to the Field Office area |
How to start | Speak to Langston at the field panopticon |
Rewards | Untapped Feeding Bottle Artifact, Aramid Work Clothes cosmetic |
The full campaign order across all three quest chains sits in the Control Resonant Walkthrough Hub. This is one of the five side quests behind the Panopticon Intern trophy, alongside Control Resonant Freeze Frame Walkthrough and Control Resonant The Party Won't Stop Walkthrough.
All Panopticon Service Request Steps
The quest runs in three stages, and only the middle one causes trouble.
- Speak to Langston and enter the panopticon
- Replace two server blocks and the satellite antenna, then activate the console
- Work out which cell the radio is really in
- Contain the radio in the correct cell while the right track is playing
How to Start Panopticon Service Request

Langston is in south-central Central, at the blue structure near the wall east of the Field Office grounds. He is also the Important Person icon you may have spotted on the map during Control Resonant Evacuation Procedures Walkthrough.
Speak to him and let him talk at length about Altered items. He eventually gets to the point: there is an Altered radio loose in the panopticon near his station, and he wants help containing it.
Head inside and turn left into the small security cubby. The gate closing behind you is part of the script, and nothing in the panopticon can hurt you, so there is no reason to back out and prepare.

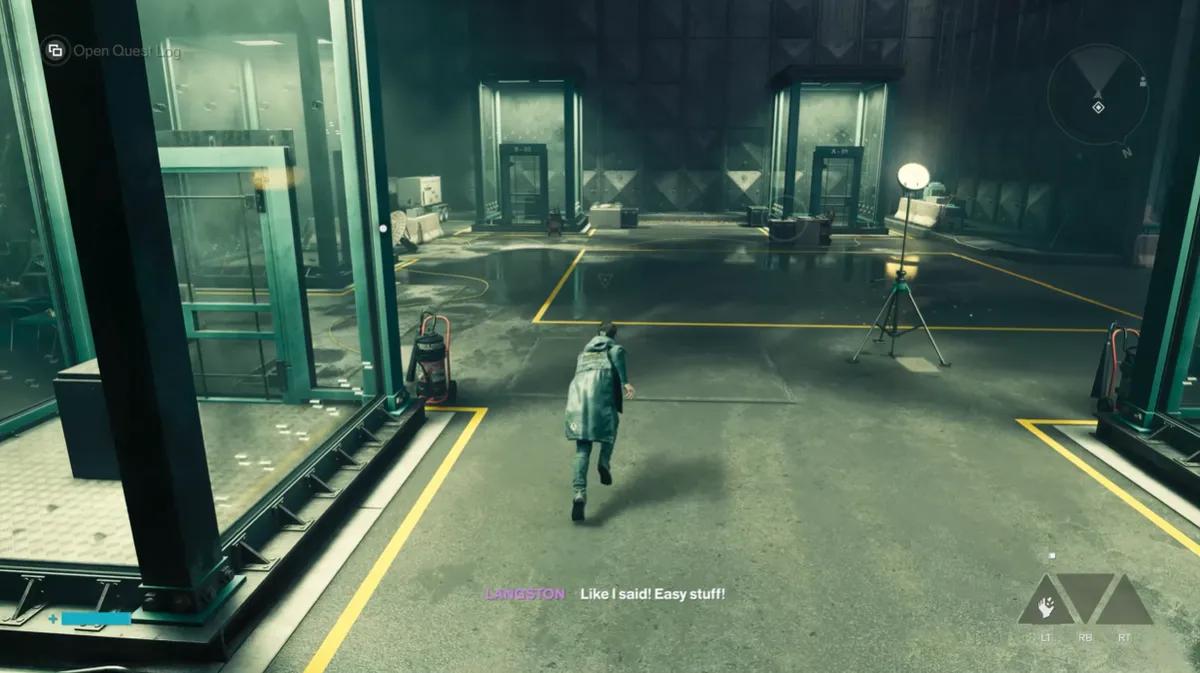
The panopticon itself is a ring of containment chambers around a central yard, each one labelled with a letter and a number. Those labels are the entire puzzle, which is worth knowing before you start walking laps of the room looking for a cell that does not exist.
How to Reassemble the Equipment

Before any of the cell doors work, the security system needs three parts back in place: two server blocks and a satellite antenna.
Server block one is near the entrance to the security cubby. Interact to pick it up, carry it to one of the red-glowing openings in the cubby, and insert it.
Server block two is across from the cubby, to the right of chamber A-01, near the concrete barriers. Same process.
The antenna is to the right of the cell labelled C-03. Pick it up, then climb on top of the cell labelled E-05. You can still double jump and mantle while carrying it, so the climb is not a problem. Place the antenna next to the red blinking light.
Return to the security cubby, interact with the console, and select Activate to bring the security system online in the larger room.
How to Find the Correct Containment Cell

Now the part that stops people.
Go to cell B-02, where the radio is, and ask Langston to open the door. He cannot, and the reason is that the labels on the cells are wrong.
Read the note to the right of the panopticon entrance. It explains that the cells were mislabelled and that the real ordering runs counter-clockwise. In practice that means A is E, B is D, and so on, with the numbers reversed the same way: 1 is 5, 2 is 4.
Applying that to B-02 gives D-04. That is the cell Langston needs to open, and it is the hardest single step in the quest.
Two worked examples make the rest of the room readable. The chamber labelled A-01, where you found the second server block, is really E-05. The chamber labelled E-05, which you climbed to place the antenna, is really A-01. The cipher is a straight mirror in both directions, which also means C-03 maps onto itself and is the one label in the room that happens to be correct.
How to Contain the Altered Radio

The last step has two conditions, and most people only notice the first.
The radio has to go into the cell whose real address is E-05. Because the labels run counter-clockwise, that is the door wearing the A-01 plate, the same chamber you passed while collecting the second server block.
The second condition is timing. The radio cycles through several audio tracks, and it can only be contained while it is playing the spot about the New York World's Fair. You will almost certainly not get that track on the first pickup.
How to cycle tracks quickly. Drop the radio, then pick it up again. The room distorts briefly and the radio switches to its next track. Repeat until the World's Fair spot starts playing.
With the right track running, carry the radio over and place it on the pedestal. Langston closes the cell remotely and the quest ends.
Panopticon Service Request Rewards

Completing the quest pays out the Untapped Feeding Bottle Artifact and the Aramid Work Clothes cosmetic.
As with other Untapped items in Control Resonant, the Artifact does nothing sitting in your inventory. It has to be activated and equipped, and its description is worth reading in full, since some Artifacts carry a drawback alongside their buff. Cosmetics go straight into the Wardrobe, which you can reach from the boxes in the Oldest House, the Field Office and several other interiors.
For a quest with no combat in it, the payout is reasonable, and it is the cheapest of the five Panopticon Intern requirements to clear.
Common Mistakes
Trying to open B-02 by label. The plates are the puzzle. B-02 on the wall is D-04 in the system.
Counting the cipher clockwise. The note specifies counter-clockwise. Reading it the other way gives you a cell that exists but is wrong.
Carrying the radio around waiting for the right track. Walking does not advance it. Dropping and re-picking it up does.
Assuming the antenna blocks your movement. It does not. Double jump and mantle both still work while holding it.
What to Do Next
Langston has more work for you later in the campaign, and Control Resonant Into the Valley of Death Walkthrough picks that thread up once the story has moved on considerably.
If you are working toward the Panopticon Intern trophy, Control Resonant Freeze Frame Walkthrough and Control Resonant The Party Won't Stop Walkthrough are the next two to clear. For something in the same region with more combat attached, Control Resonant Crossing the Threshold Walkthrough starts a short walk west of the Field Office.


 Başarıyla kopyalandı... İçeriğimizi paylaştığınız için teşekkür ederiz!:



100 mücevhere kadar %5 para yatırma bonusu

Para yatırma ve çekme işlemlerinde %0 ücret.





11 Para Yatırma Bonusu + FreeSpin


EKSTRA %10 PARA YATIRMA BONUSU + ÜCRETSIZ 2 ÇARK DÖNDÜRME

Ücretsiz Kasa ve %100 Hoş Geldin Bonusu


5 Ücretsiz Kılıf, Günlük Ücretsiz ve Bonus

3 ücretsiz kasa ve tüm nakit para yatırma işlemlerine %5 bonus eklenir.

Depozitoya +%5




Yorum